How to Change a QuickBooks Desktop License Number or Product Code?: A Step-by-Step Guide
Tax services, Accounting Services?
You Focus On Your Business, We Will Do Your Books. Independent QuickBooks Setup Services. We are one of the Best Advanced QuickBooks ProAdvisors in US


Monthly Accounting, BookKeeping Solution or One time help for Entrepreneurs and Small Businesses using Quickbooks and Sage Users

Connect with Pro Advisors, for all things Quickbooks
- Quickbooks Payroll Issue
- Quickbooks Error
- QuickBooks Accounting
- QuickBooks Accounting
Changing the license number or product code in QuickBooks Desktop is a straightforward process that allows users to update their software information. Whether you’ve upgraded your product, purchased a new license, or need to correct an error, QuickBooks provides a simple solution. This step-by-step guide will walk you through the process, ensuring a smooth transition without compromising your financial data. By following these instructions, you’ll be able to successfully update your QuickBooks Desktop license number or product code, ensuring compliance with licensing agreements and keeping your accounting software up-to-date. Let’s dive into the easy-to-follow steps for a seamless transition.

Why Change the License Number or Product Code?
Before diving into the process, understanding why you might need to change your QuickBooks Desktop license number or product code can be helpful. Here are a few common reasons:
- Upgrade: When you upgrade your QuickBooks Desktop software to a newer version, it might require a new license number or product code.
- Reinstallation: If you’re reinstalling QuickBooks Desktop, you’ll need to enter a new license number or product code during the installation process.
- Transfer of Ownership: In some cases, if there’s a change in ownership or if you’ve purchased a new license, you’ll need to update the license number or product code accordingly.
How to Modify the License Number or Product Code for QuickBooks Desktop
Step 1: Gather Necessary Information
Before making any changes, gather the required information. Ensure you have the new license number or product code you want to use.
See Also: How to Fix QuickBooks Error 6129
Step 2: Open QuickBooks Desktop
Launch QuickBooks Desktop on your computer.
Step 3: Access the Help Menu
Click on the “Help” menu at the top of the QuickBooks window.
Step 4: Select “Manage My License”
From the Help menu, choose “Manage My License” and then click on “Change My License Number.”
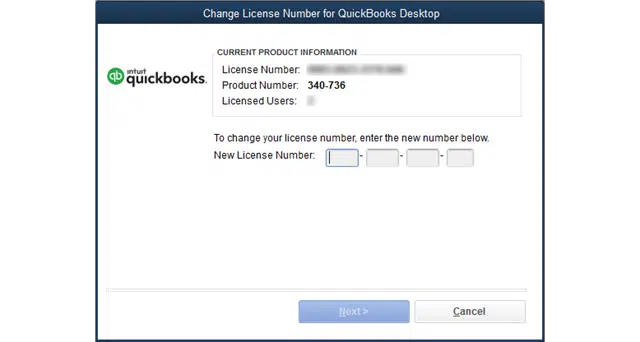
Step 5: Enter New License Information
A window will prompt you to enter the new license number or product code. Input the new details carefully.
Step 6: Confirm Changes
After entering the new license information, follow the on-screen instructions to confirm and complete the process.
Step 7: Restart QuickBooks Desktop
Once the changes are confirmed, close and restart QuickBooks Desktop to ensure the new license number or product code is properly applied.
Troubleshooting Tips
Here are some troubleshooting pointers in case you run into any problems during the process:
- Internet Connection: Ensure you have a stable internet connection as QuickBooks might require it to validate the new license information.
- Check for Updates: Make sure your QuickBooks Desktop is up to date. Sometimes, updating the software can resolve issues related to changing the license number or product code.
- Contact Support: If you’re unable to change the license information on your own, consider reaching out to QuickBooks support for assistance.
Final Thoughts
Changing your QuickBooks Desktop license number or product code is a simple process that ensures you’re using the software with the correct licensing information. Remember to keep your license details secure and always use genuine licenses to comply with licensing agreements .By following these steps, you can easily update the license information in your QuickBooks Desktop software, allowing for a smooth and uninterrupted accounting experience. Make sure to back up your company file before making any changes to ensure your data is safe throughout the process.
This guide aims to simplify the process of changing a QuickBooks Desktop license number or product code for users. If there’s anything specific you’d like to add or modify, feel free to let me know!
Ask for expert help!
Coming towards the end of this post, we hope that the information provided above will prove helpful in resolving the . If the error persists or if you encounter challenges while applying the suggested fixes, it’s advisable not to spend too much time attempting further solutions. Data damage problems can be sensitive, and attempting trial-and-error methods might lead to severe data loss.
Feel welcome to reach out to our professionals at Number. Our QuickBooks error support team is available 24/7 to assist you in resolving the issue without causing additional complications.
Frequently Asked Questions about QuickBooks Error H505
Yes, you can change your QuickBooks Desktop license number whenever needed. Follow the outlined steps in this guide to make the necessary changes.
Yes, a stable internet connection might be required as QuickBooks may need to validate the new license information online.
No, changing the license number or product code shouldn’t affect your data or company file. However, before making any changes, it’s always advised to make a backup of your data.
If you face any difficulties or encounter errors during the process, ensure your QuickBooks Desktop is updated. If issues persist, contacting QuickBooks support is advisable for assistance.
Typically, once you’ve changed the license number, reverting to the previous one might not be possible. Make sure to enter the new information accurately.
Not necessarily. If you’re upgrading or reinstalling QuickBooks Desktop, you might need to enter a new license number or product code, but it doesn’t always require purchasing a new license.


